Copper Jewlery Display
This one was a creative solution. I brought some of my jewelry into a shop to sell, and the owner wanted me to bring in some sort of display to put it on. I looked at loads of displays on the Internet, and my favorites were artists' commissions. Since nothing quite fit the description of what I needed, I decided it made no sense for me, as an artist, to commission another artist to make something that would express my style. I should make it myself, right? How hard could it be?
So I sourced materials, drew a diagram of what I wanted, and showed it all to my Dad, who can make anything. He said it could be done, so we ordered the copper and spent an entire day making the basic structure - 12 hours! This was because for some reason the solder refused to stick to the copper, so we had to create fittings at each joint for the solder to sit inside until it set. That was alright, since I was able to cover those bits with the wired decorations later. Here's how it went.
So I sourced materials, drew a diagram of what I wanted, and showed it all to my Dad, who can make anything. He said it could be done, so we ordered the copper and spent an entire day making the basic structure - 12 hours! This was because for some reason the solder refused to stick to the copper, so we had to create fittings at each joint for the solder to sit inside until it set. That was alright, since I was able to cover those bits with the wired decorations later. Here's how it went.
The diagram shows: at left, the sheet cutting pattern, in the middle, the front view, and at right, how it would sit on the store counter with foot display pieces for barefoot sandals. Materials used were copper sheet, rod, and wire in different gauges. We followed the diagram to cut (using a tube cutter) and solder the rod for the basic framework, which was the most time-consuming part because of the aforementioned soldering issue. Then we cut the shelves from heavy copper sheet with tin snips, folded them at the edges, and fitted them snugly to the rods. The 1/4" rod was too big to hold earrings, so a line of heavy gauge wire was added just under the top shelf to hang them from.
Now for the fun part - decorating! I used rolls of a lighter, though still pretty thick, copper sheet for the leaves and flowers. I drew some shapes with a Sharpie, scanned them, and printed them in the sizes I needed. Then I cut them out and taped them to the copper sheet so I could cut them out of the sheet with tin snips.
I filed the edges of the shapes and used a hammer and a small flat-blade screwdriver to texture them and make veins for the leaves. Small holes were made in them to pass wire through to attach beads to them and to attach the leaves and flowers to the frame. For beads, I used turquoise, which has an affinity for copper. Did you know that copper in the ground is what gives turquoise its color? And when copper develops a verdigris, it is a turquoise-ish green, like the Statue of Liberty, which is made of copper and has aged to that color. Cool!
Scotch tape was used to hold the main elements in place temporarily, then I used wire to represent vines so the flowers and leaves would seem to grow up the structure. When I got to an element, I wired it on in that spot, hiding the joints at the same time. There are critters, too: dragonflies, butterflies, and a frog sit in various spots, and on the front, a chameleon peeks out, since that was my jewelry company's namesake (the name has since changed). The style is similar to my wire and bead jewelry, which was the point - it represents my style.
Scotch tape was used to hold the main elements in place temporarily, then I used wire to represent vines so the flowers and leaves would seem to grow up the structure. When I got to an element, I wired it on in that spot, hiding the joints at the same time. There are critters, too: dragonflies, butterflies, and a frog sit in various spots, and on the front, a chameleon peeks out, since that was my jewelry company's namesake (the name has since changed). The style is similar to my wire and bead jewelry, which was the point - it represents my style.
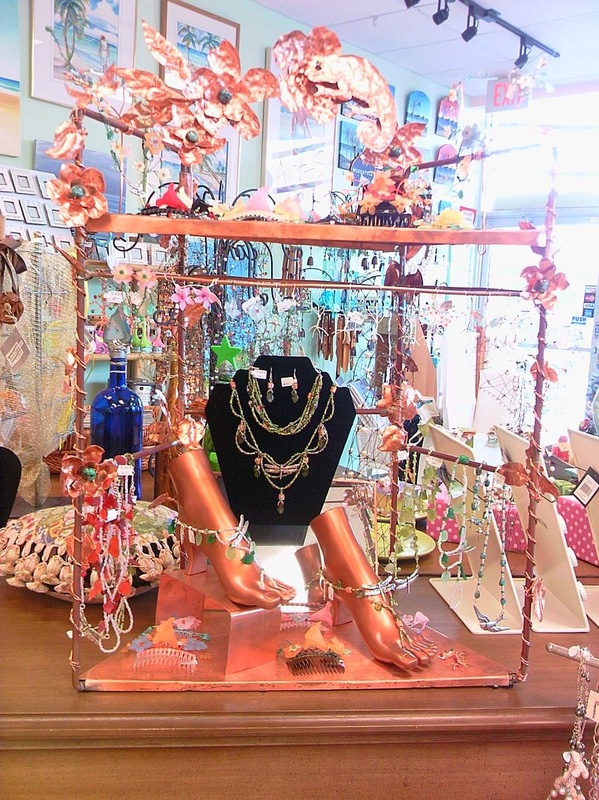
And here it is in the shop, festooned with jewelry.
Art Tiles
I always wanted to learn to make pottery. A friend took me to the fair in Raleigh, N.C. a while back, and we met Marina Bosetti of Bosetti Art Tile in the pottery tent. She does beautiful work, and in my favorite style - Art Nouveau! I bought a few small tiles and got her card. Later, I looked up her website and realized she teaches, too. I was going to visit again, so I contacted her and asked if she would teach me and my friend how to make and decorate tiles using the same technique. She was happy to take us for three days, and this is what I made.
The dragonfly tile above is 12" square, and the poppy is 4" square. The decorative technique is called "Cuerda seca", which means "dried cord", and was invented in Spain in the 15th century to give the effect of mosaic without having to cut out all those tiny tiles and grout them back together. It involves painting very fine lines of wax onto the blank fired tile, then glazing between these lines. When the glazed tile is fired again, the wax burns off and leaves the bare fired tile in its place, so you have raised glazing separated by bare clay, which looks similar to grout.
Not only am I very happy with my tiles, but I am especially excited to have learned how to make tiles from a block of clay, decorate them with cuerda seca, and do some slab construction as well. I made a set of five tiles that can be used individually or as a mural or backsplash, then used the rest of that block of clay to make two boxes, all of which she fired for me. It would have taken too long to use the tiles I made for my project, as I only had three days, so the tiles I decorated were ones she had on hand. I practiced first on the 4" tile, drawing my design in pencil, painting the lines in wax with a tiny brush, then glazing between once the wax was dry. Then I was ready to move on to the dragonfly.
When the glaze was dry, the pieces looked like the "intermediate" pictures in the slideshow above. It was another week before I got my fired pieces in the mail, but it sure was a thrill when they arrived. You can never quite be sure how the glaze will turn out, as each firing may be different - there are so many factors. So I have my finished tiles, and one day I will decorate the unglazed tiles and boxes. And now that I know how to do it and have a small kiln of my own, I want to use clay and cuerda seca to create pendants for my jewelry. One day...
